
The IVAR modular shelving system has been a staple of the IKEA product line for many years. In addition to the wide variety of IVAR components and accessories IKEA sells, owners have come up with many innovative designs to adapt the IVAR products to their own uses. This project uses an IVAR corner unit as the basis for a computer desk with raised monitor shelf using commonly available composite spruce panels. The project could be built more cheaply with ¾” plywood, however it might be problematic to mill the mortise and tenon joints on the monitor shelves using plywood. The deep shelves may be extended indefinitely to the right and left by building as many extension shelves as needed.
Before I begin with the description of the project, let me just quickly answer the question that is no doubt going through the reader’s mind, IVAR makes deep shelf units. Why not simply use them? The problem is that the legs for the IVAR leg units would partially block the view of the monitors similar to a pillar in a sports stadium. Also, I wanted to have a work space in easy arms reach with the monitors set further back and elevated so that the workspace could extend underneath them. The additional depth also allows moving back and forth along the desk without bumping one’s knees on the legs. Besides, building it was fun, and not overly expensive, and I already had plenty of the shallow (11-7/8″) IVAR shelf units on hand.
WARNING – The drawing dimensions below are based upon spruce panels which are exactly 20, 16, or 12 inches deep. Some of the spruce panels on sale in home stores are slightly (approx. 1/8″) shallower. If your panels are not exactly the nominal depth, you will need to adjust the measurements in the drawings to compensate.
Required Tools
I have some tools available which not every do-it-yourselfer may have on hand. Never fear. Most of the required milling can be done with a circular saw, straight edge, and clamps, and a saber saw. The mortise and tenon might be a bit tricky without a router or tenoning jig for a table saw, and a mortising machine. Here’s what I used.
- Circular saw
- Compound miter saw
- Table saw
- Saber saw
- Router with appropriate bits for creating the mortises and tenons
- wood chisel
- Palm sander
Required IVAR Components
The basis for the project is an IVAR corner unit as shown below. Note that the drawing shows an extension on the right, whereas the installation that was built puts the extension on the left as shown in the photos. The extensions can easily be installed on the right or left as desired simply by inverting them. The required IVAR components are listed on the drawing.


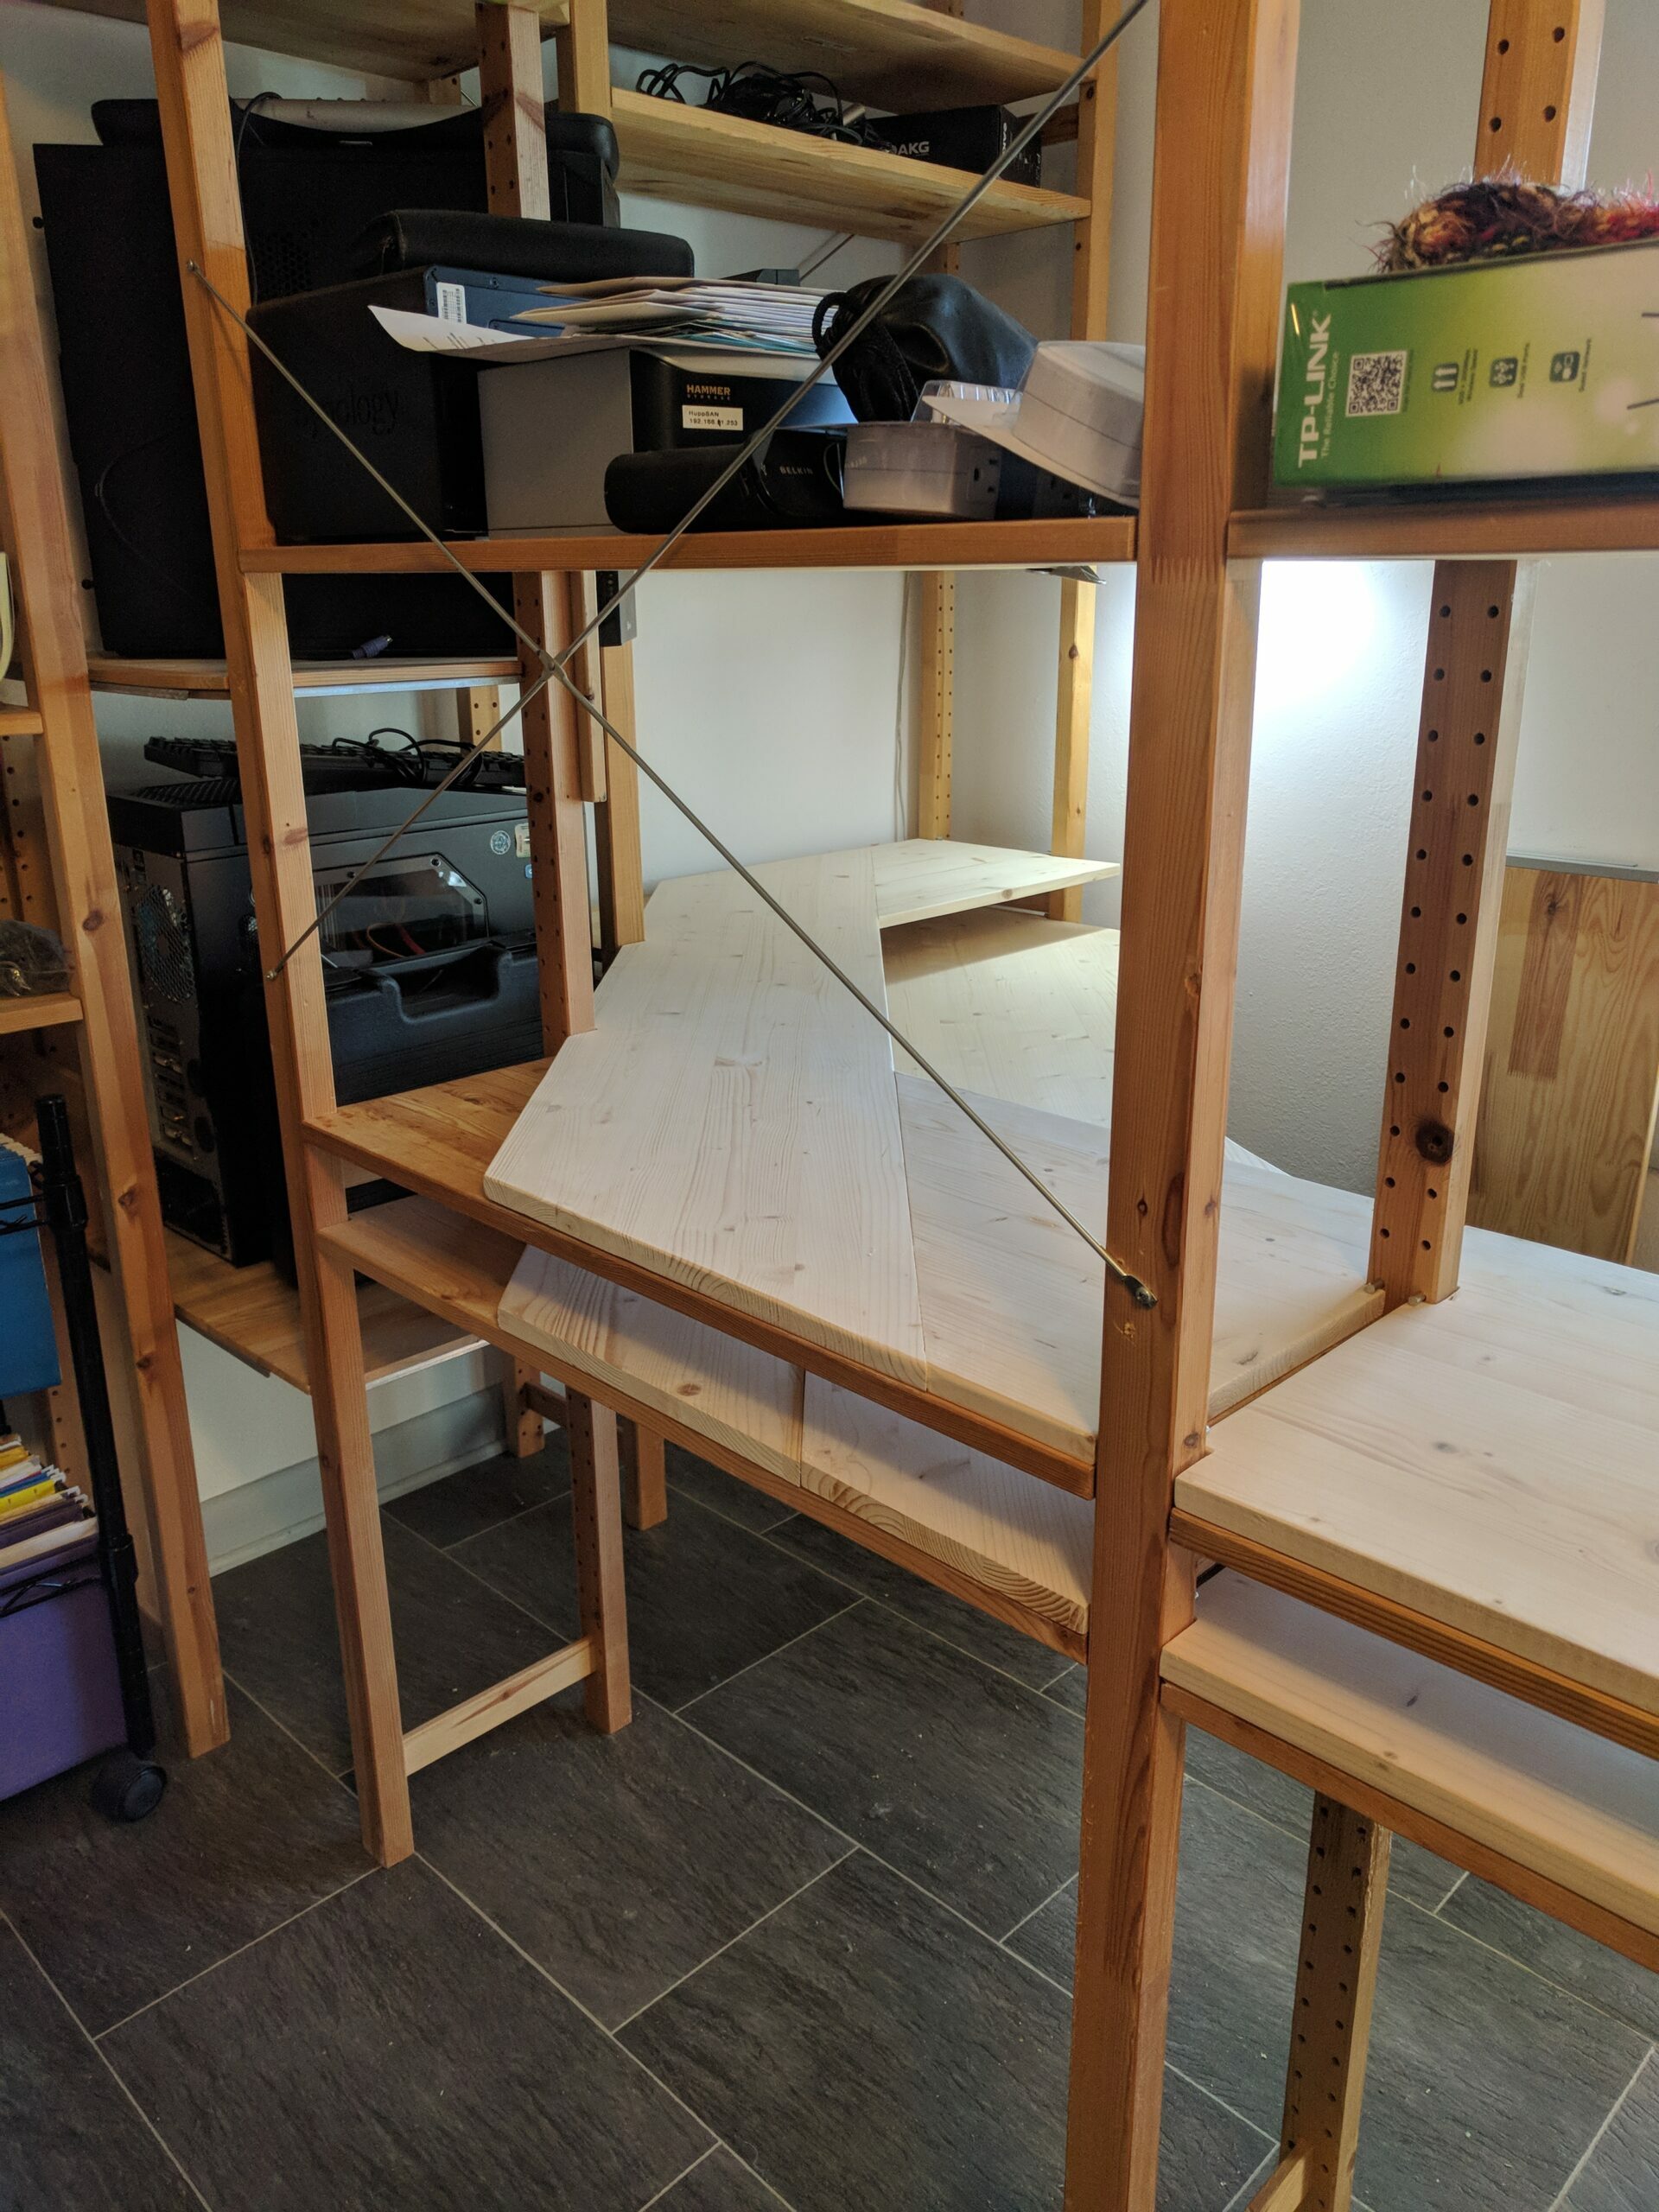
The custom shelves rest on standard IVAR long shelves. This provides the necessary support for the custom shelves, particularly the monitor shelf which is made up of three pieces that are not fastened together except with a shallow mortise and tenon which would be inadequate to support the weight of the monitors on their own. Also, the combined thickness of the two shelves raises the top of the custom shelves to exactly the right height for them to be held down with IVAR shelf support pins. This prevents the shelves from tipping when weight is placed on the front of the shelf. No other fasteners are needed. The pins, mortise and tenon joint, and notches cut into the shelves keep everything firmly in place.
Building The Desk
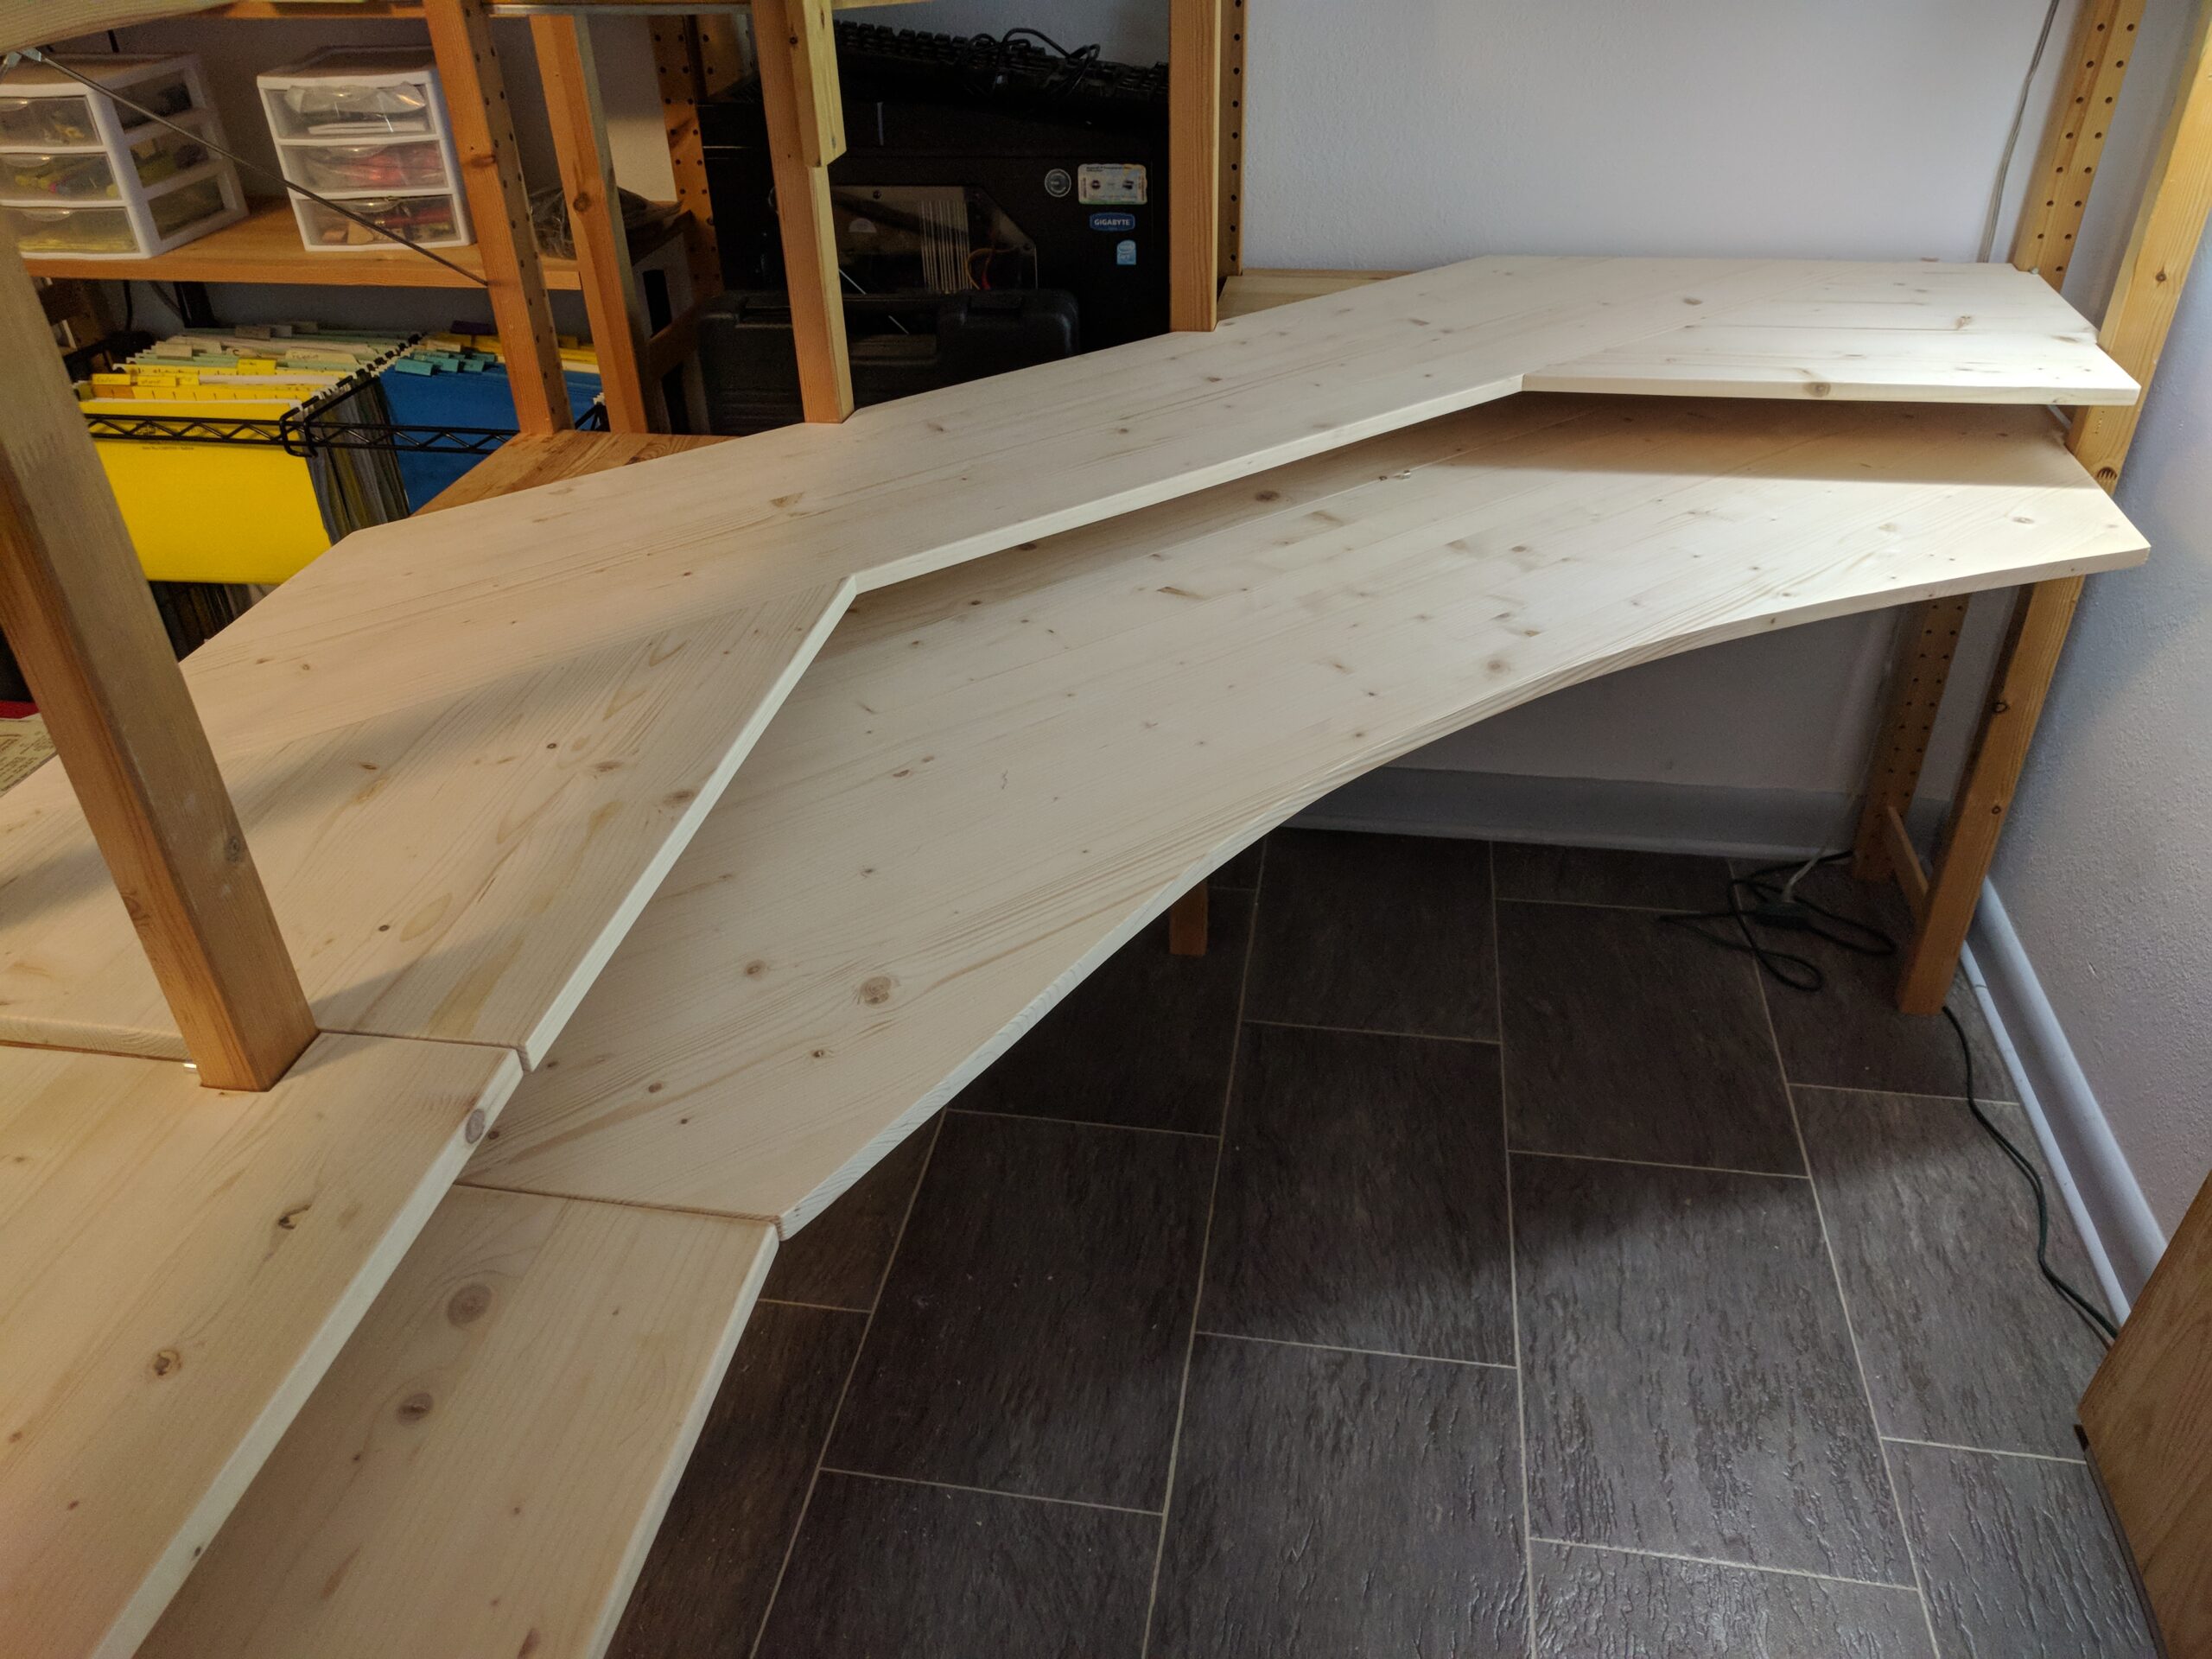
The desktop is made of two parts which stretch across the IVAR corner diagonally. The front shelf (closest to the user) is notched to mate with the IVAR legs just as standard IVAR shelves are. It is placed in the corner first, and the rear shelf (closest to the corner) is slipped in behind it, fixing the front shelf in place.
The front shelf is constructed from a 96″ x 20″ x ¾” composite spruce panel as shown below.
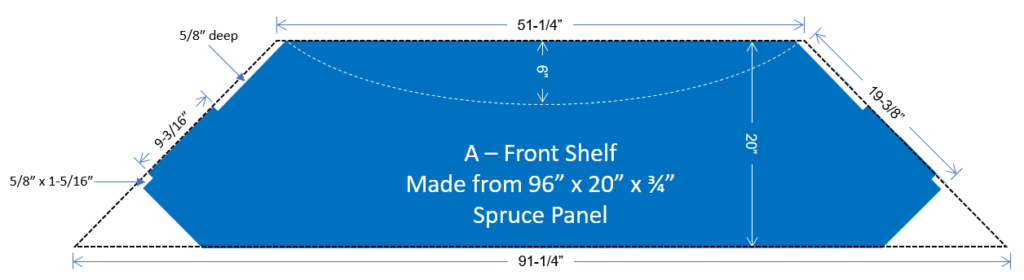

The first step is to make 45° miter cuts in the panel to form a trapezoid with the dimensions shown. Notice that the piece is cut long enough to allow for the 5/8″ tabs that mate with the IVAR legs.
Next cut off the long corners of the trapezoid with the dimensions shown in the drawing, leaving an irregular hexagon shape.
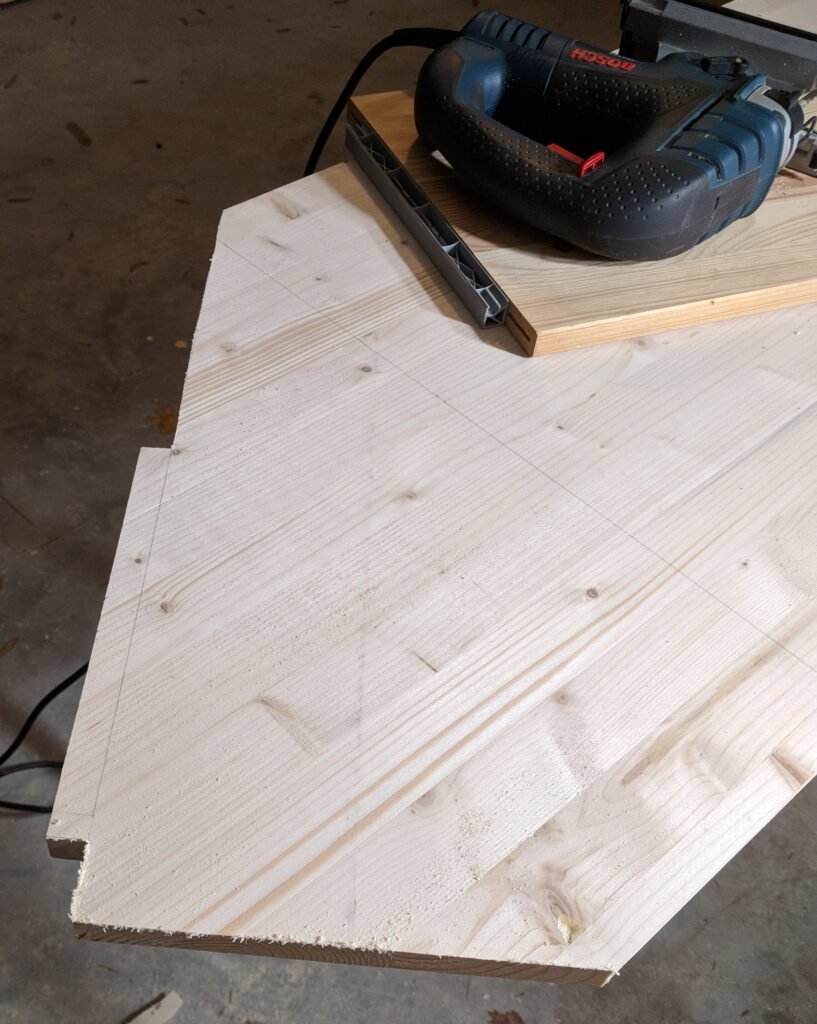
Finally, cut the notches that will mate with the IVAR legs. Notice that the front notch is cut all the way to the front edge rather than notched to the leg dimension (1-1/4″). Otherwise it would be impossible to tilt the shelf piece into position in the IVAR corner.
At this point, the desktop front shelf is ready for a test fit into the IVAR corner. The rounded cut out in the front edge is optional, and can be made after everything else is done.
With the desktop front shelf ready to go, we move on to the desktop rear shelf.

The first step in making the desktop rear shelf is to rip the 72″ x 12″ x ¾” spruce panel to the required depth (8-7/8″) on the table saw or with a circular saw and straightedge. Next make 45° miter cuts to form a trapezoid with the dimensions shown.
Finally, use the saber saw to cut the notches out of the rear edge which will mate with the front legs of the IVAR corner unit.
The curved cutout of the desktop front shelf’s front edge is optional, and recommended. This cut is made with the saber saw.
The desktop shelf is now complete and ready for installation. The front shelf is placed into the corner first. It must be tipped into place just like an ordinary IVAR rectangular shelf. Next, slip the desktop rear shelf into place behind the desktop front shelf. Once the rear shelf drops into place with its rear edge notches mated with the IVAR corner shelf legs, insert IVAR shelf support pins above the front shelf to prevent the shelf from tipping. No hold-down pins are required for the rear shelf since it is fully supported by the two IVAR rectangular shelves underneath it, and therefore it can’t tip forward.
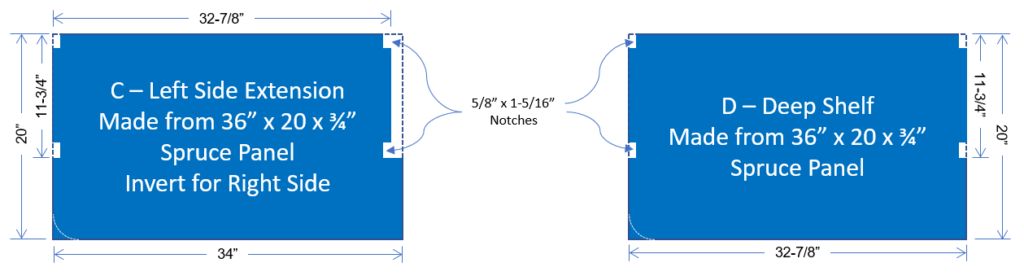
The desktop shelf extensions are optional. The extensions closest to the corner are different from the remaining extensions in that the depth of the front notch is the full width of the IVAR leg (1-3/4″). These inboard extensions may be inverted to allow for installation to the right or left of the corner unit. The remaining extension shelves are identical to ordinary IVAR rectangular shelves except that they are deeper, extending out from the IVAR leg unit in front. Optionally, the outermost front corner of the outermost extension shelf may be beveled or rounded as shown in the drawing.
Note that any extension shelves will also need to be installed resting on standard IVAR rectangular shelves and held down with IVAR shelf support pins to prevent them from tipping.
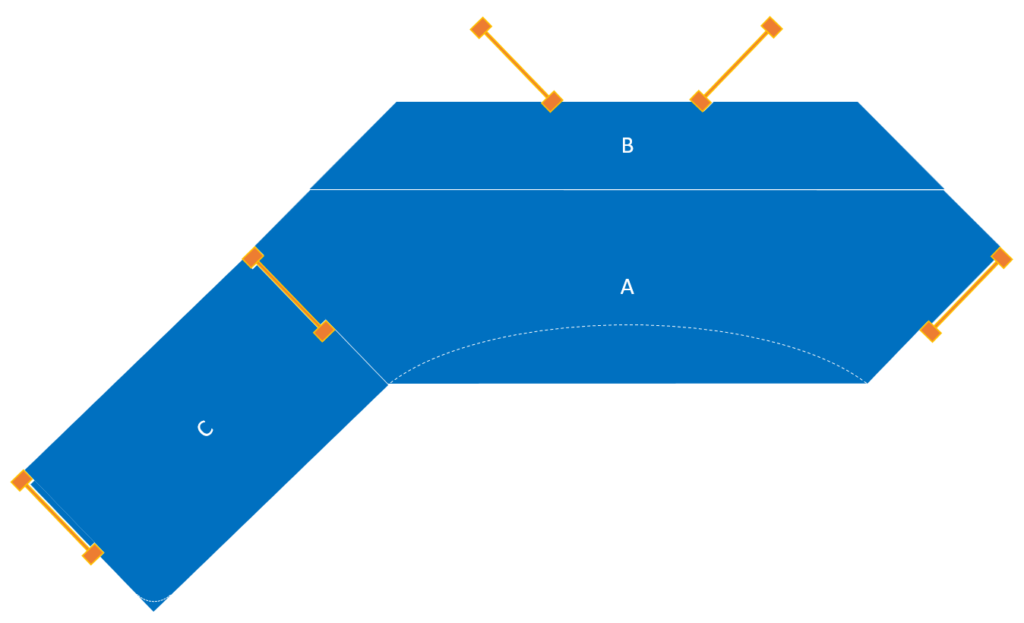
The complete desktop shelf assembly is shown in the drawing below along with the locations of the IVAR legs. One extension shelf on the left-hand side is shown in the drawing. Note that extension shelf C could also be installed on the right simply by inverting it. The underlying IVAR shelves are not depicted in the drawing.
Building the Monitor Shelf
The monitor shelf is made up of three pieces – a center shelf which abuts the IVAR corner shelf legs, and two side wings which connect to the center shelf with a shallow mortise and tenon. The side wings tilt into the end legs of the desk as an ordinary IVAR rectangular shelf would.
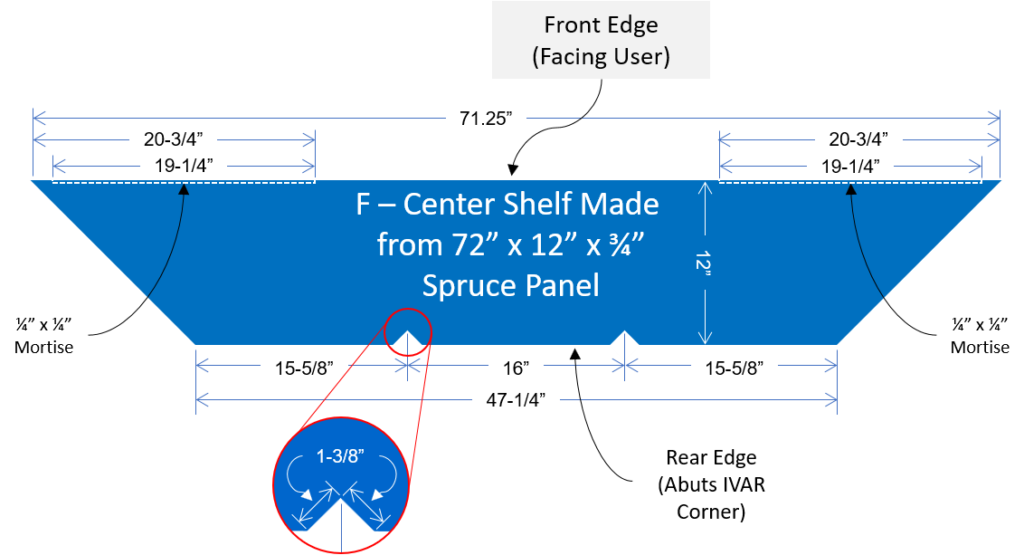
Building the monitor center shelf is similar to the desktop rear shelf. Unlike the desktop rear shelf, there is no need to rip the monitor center shelf to depth. It is constructed from a 72″ x 12″ x ¾” spruce panel which is already the correct 12″ depth.
First make 45° miter cuts in the panel to form a trapezoid with the dimensions shown as with the desktop rear shelf. Measure and cut carefully, as the finished shelf is 71-1/4″ long from the original 72″ panel. Leaving little room for error.
Next cut the notches in the rear edge which will mate with the IVAR corner shelf support legs.
Finally, cut ¼” x ¼” mortises into the front edge of the shelf as shown. These will mate with tenons milled into the diagonal edge of the two monitor shelf wings.
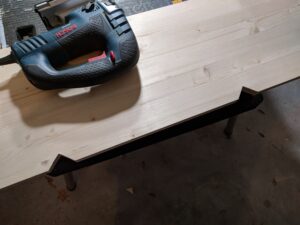
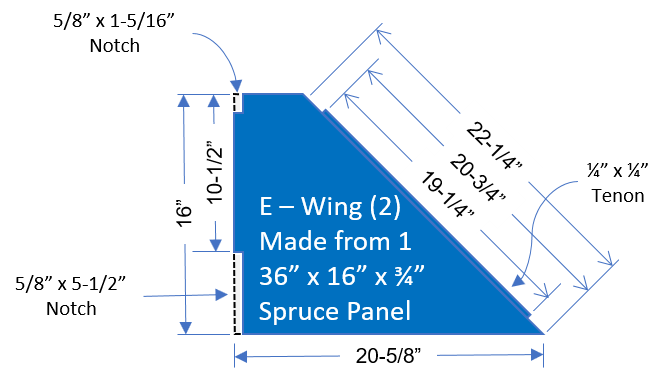
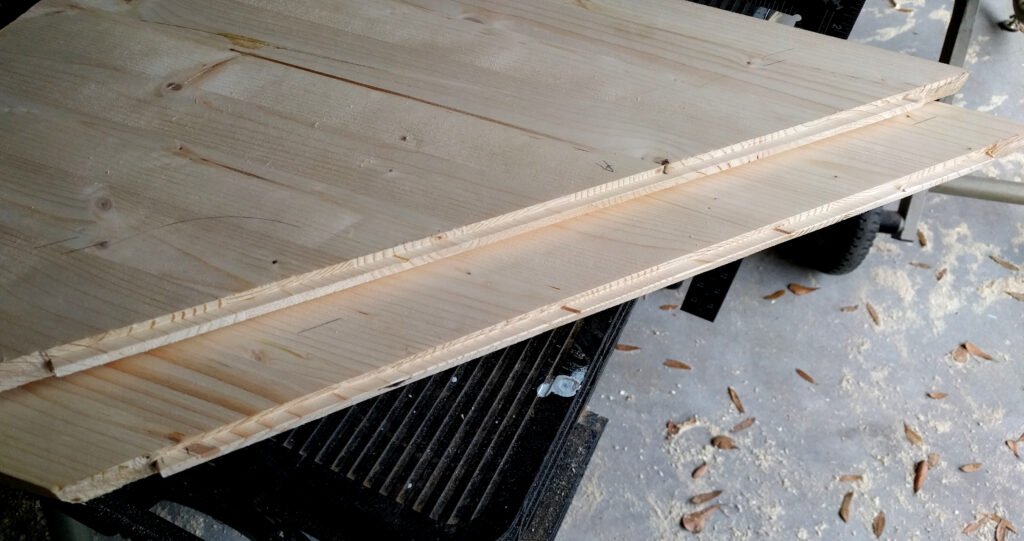
The two monitor shelf wings are taken from a single 36″ x 16″ x ¾” spruce panel. Begin by cutting the panel in half diagonally with a single 45° miter cut down the middle of its length leaving two pieces just a little less than 26″ on their long edge.
Next cut the ¼” x ¼” tenons which will mate with the monitor center shelf mortises into the diagonal edges of the two wings.

Finally, cut the wings to length and cut out the notches which will tilt into the IVAR legs at the ends of the monitor shelf.
WARNING – Do not reverse these steps! If you mill out the tenons after cutting the wings to length they will not mate fully into the IVAR legs, and the consequent gap will allow the monitor shelf mortise and tenon joint to pull apart. Sound like the voice of experience speaking?
As with the desktop shelf, the monitor shelf extensions are optional. Build as many or as few as desired using 16″ deep ¾” thick spruce panels.

The extensions closest to the corner are different from the remaining extensions in that the depth of the front notch is the full width of the IVAR leg (1-3/4″). These inboard extensions may be inverted to allow for installation to the right or left of the corner unit. The remaining extension shelves are identical to ordinary IVAR rectangular shelves except deeper, extending out from the IVAR leg unit in front. Optionally, the outermost front corner of the outermost extension shelf may be beveled or rounded as shown in the drawing. Extension shelves are installed resting on standard IVAR rectangular shelves and held down with IVAR shelf support pins to prevent them from tipping.
The monitor shelf is now ready for a test fit into the IVAR corner unit.
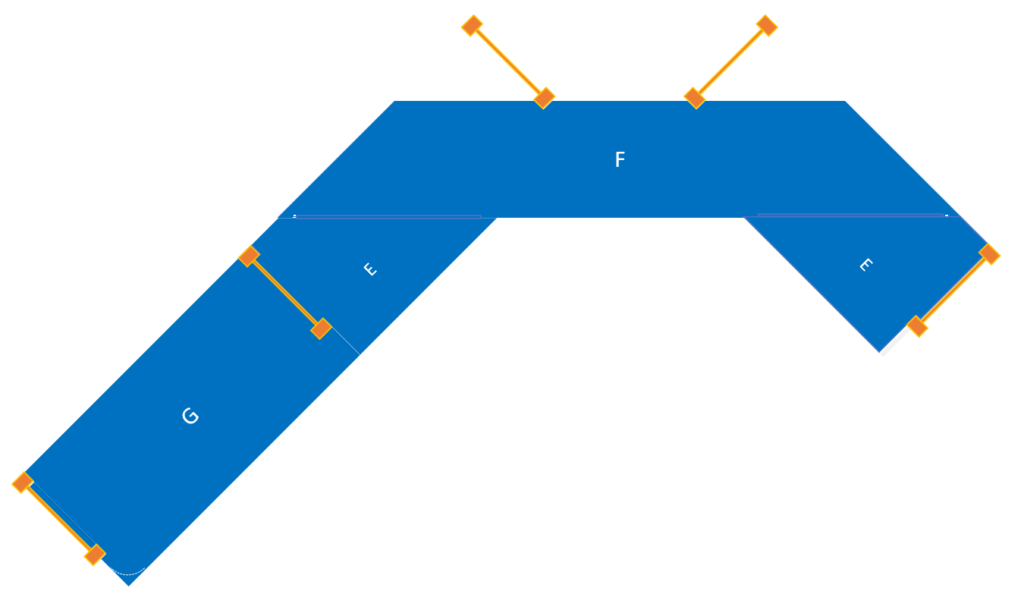
Begin by fitting the tenon of one wing into the corresponding mortise in the center shelf. Slide this partial assembly into place in the IVAR corner unit with the notches in the wing and center shelf mating with the corresponding IVAR leg units. Place the other wing’s leg notches into the opposite end IVAR leg, and gently lift and tilt this wing and the center shelf up far enough to allow the wing tenon to slide into the corresponding mortise in the center shelf. After lowering onto the supporting IVAR rectangular shelves, the monitor shelf will be locked in place. Insert hold-down pins into the IVAR legs above the monitor shelf to prevent it from tipping or pulling apart. No other fasteners are required.