Building Our Steel Arch Garage
- Part 1 – Ordering the Kit (First Missteps)
- Part 2 – Garage Foundation
- Part 3 – Foundation Issues
- Part 4 – Assembling the Arches
- Part 5 – Raising the Arches – you are here
- Part 6 – End Wall Woes
- Part 7 – Door Installation
Raising the Arches
After months of preparation and planning, the day finally came to raise the arches. Here’s the view from the top of the scaffold we rented from our local Home Depot. The first arch is waiting to be hooked on and raised up, and the other twelve arches are lined up nested together behind it, awaiting their turns.

I built a wooden gantry attached to the scaffold to aid us in pulling the arches into place. The arches were attached with short chains to the ends of the gantry arms, and then we used ratcheting pulleys hung from the fixed posts of the gantry to pull up the gantry swing arms a little at a time until the arch was nearly vertical. At that point, the top of the arch could be shifted from the gantry swing arm onto the fixed legs of the gantry, and the swing arms were then lowered. The whole assembly was then moved forward into position to tie on the next arch.
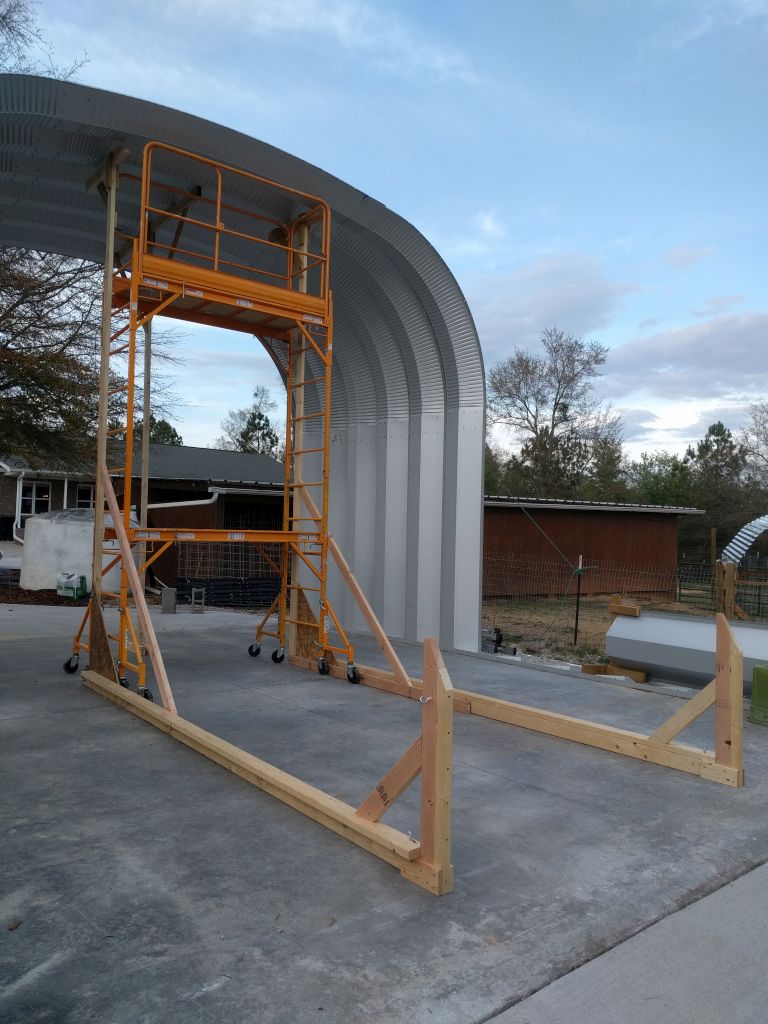
The gantry allowed us raise the arches with only three people. The swing arms held the arch out away from the building as it was being raised, preventing the pulley ropes from pulling the whole arch into the building. That way with one person stationed at each side just to guide the arch ends into the IBC tie down brackets, the third person could pull on each of the ratcheting pulley ropes a little at a time, while lifting up on the corresponding gantry swing arm. Between lift increments, the arch rested comfortably suspended from the ratchet pulleys and held in position by the gantry swing arms.
Once the arch was fully raised, someone had to climb up the scaffold and lift the new arch over the previous one so that the new arch could be bolted in place. The entire process took roughly a half hour per arch. The first two arches were the hardest to raise, because we were still learning the procedure, and even once the first arch was up, it was still extremely flexible, and easy to damage by over bending. Note the dead man supports under the arch center line. These remained in place until all the arches were in place and the bolts were tightened down.
We managed to raise the first six arches the first day with the help of two friends who volunteered. The weather was poor for the next few days, and the remaining arches weren’t raised until the day before the scaffold was due back to Home Depot. Thankfully, we finally had some decent weather to finish the job. Here’s what things looked like as we set out to work that day.

Our friends weren’t available that last day, so Sue, our son Jeremy, and I raised the remaining seven arches. It was a long day, and we finished up by the light of the vehicle headlights about 9 PM. Here’s what the building looked like the next morning after we got back from taking the scaffold back to Home Depot. Notice the end wall angles bolted to the outer edges of the end arches. Also, check out the green tie off rope that Sue used to tie her safety harness into while she was on top of the building installing bolts, because I was too much of a wimp to climb up and do it. She is absolutely amazing, especially considering that when we were first married, she was absolutely terrified of heights just like I am now.

During the arch raising, only every third bolt was installed starting from the IBC tie down bolts at the bottom end of the arches. None of the bolts (except the concrete anchor bolts) were tightened down to their specified torque until all arches were raised, all bolts installed hand tight, and the building had rested in place for a week to allow it to settle and shift with the wind and daily expansion and contraction cycle.
Next post – Building Our Steel Arch Garage Part 6 – End Wall Woes
Previous post – Building Our Steel Arch Garage Part 4 – Assembling the Arches